
Skill Level: Intermediate
Size: Teen/Women's, 21-22" head circumference, 4" wide
Supplies:
Supplies:
Red Heart With Love Yarn, approx. 150 yds.
Abbreviations (US Terms):
Bpdc - Back Post Double Crochet
Ch - Chain
Dc - Double Crochet
Fpdc - Front Post Double Crochet
Fptr - Front Post Treble Crochet
Sc - Single Crochet
Sk - Skip
Ss - Slip Stitch
St - Stitch
Important Notes:
-Ch 2's count as a dc.
-Gauge: 4 dc & 2 rows = 1"
-Gauge: 4 dc & 2 rows = 1"
This pattern now has a partial video tutorial to help with learning the cables! Check it out below or find the By Jenni Designs channel on YouTube!
Row 1: Ch 15, dc in 3rd ch from hook and in each ch across. Ch 2, turn. (14 dc)
Row 2: Sk first st, fpdc in next st, dc in next 2 st, fpdc in next 6 st, dc in next 2 st, fpdc in next st, dc in last st. Ch 2, turn. (6 dc, 8 fpdc)
Row 3: Sk first st, bpdc in next st, dc in next 2 st, bpdc in next 6 st, dc in next 2 st, bpdc in next st, dc in last st. Ch 2, turn. (6 dc, 8 bpdc)
Row 4: Sk first st, fpdc in next st, dc in next 2 st, sk 3 st, fptr in next 3 st. Fptr in 1st skipped st, fptr in 2nd skipped st, fptr in 3rd skipped st. Dc in next 2 st, fpdc in next st, dc in last st. Ch 2, turn. (6 dc, 2 fpdc, 6 fptr)
**Row 5: Sk first st, bpdc in next st, dc in next 2 st, bpdc in next 6 st, dc in next 2 st, bpdc in next st, dc in last st. Ch 2, turn. (6 dc, 8 bpdc)
Row 6: Sk first st, fpdc in next st, dc in next 2 st, fpdc in next 6 st, dc in next 2 st, fpdc in next st, dc in last st. Ch 2, turn. (6 dc, 8 fpdc)
Row 7: Sk first st, bpdc in next st, dc in next 2 st, bpdc in next 6 st, dc in next 2 st, bpdc in next st, dc in last st. Ch 2, turn. (6 dc, 8 bpdc)
Row 8: Sk first st, fpdc in next st, dc in next 2 st, sk 3, fptr in next 3 st. Fptr in 1st skipped st, fptr in 2nd skipped st, fptr in 3rd skipped st. Dc in next 2 st, fpdc in next st, dc in last st. Ch 2, turn. (6 dc, 2 fpdc, 6 fptr)**
Continue to repeat from **to** for a total of 48 rows.
(Edge)
After row 48 fold the ear warmer in half with the right sides facing each other so you can slip stitch row 1 to row 48.

Row 1: Ch 1 and proceed to ss across making sure you are working through all 4 loops as you go.


After you have slip stitched across turn the ear warmer right side out and ch 1.
Now you will be working a row of sc's around the edge over the dc's & ch 2's. Begin by working 2 sc into the first space, work 1 sc into the next space. *2 sc over next, 1 sc over next.* Repeat *to* around. Join with a sl st. You should end with 72 sc.


Row 2: Ch 1 & sc in each space around. Join with a ss. (72 sc)
Fasten off.
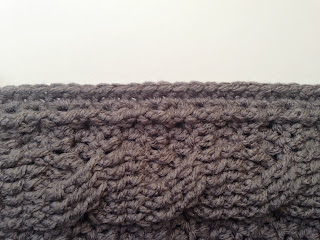
Your edge should look nice and straight now.
Next, join yarn to the opposite side of the ear warmer with a ss and repeat rows 1 & 2.
(Edge)
After row 48 fold the ear warmer in half with the right sides facing each other so you can slip stitch row 1 to row 48.
(click to view larger)

Row 1: Ch 1 and proceed to ss across making sure you are working through all 4 loops as you go.


After you have slip stitched across turn the ear warmer right side out and ch 1.
Now you will be working a row of sc's around the edge over the dc's & ch 2's. Begin by working 2 sc into the first space, work 1 sc into the next space. *2 sc over next, 1 sc over next.* Repeat *to* around. Join with a sl st. You should end with 72 sc.


Row 2: Ch 1 & sc in each space around. Join with a ss. (72 sc)
Fasten off.

Your edge should look nice and straight now.
Next, join yarn to the opposite side of the ear warmer with a ss and repeat rows 1 & 2.

Thanks for stopping by!
-Jenni
Thanks so much for the free pattern! Keep up the great designing : )
ReplyDeleteYou're welcome and thank you!
DeleteGreat pattern Jenni! thankyou :) I have never done a cable stitch and you explained it so clearly! love it. Another question. Are we able to sell items made from this pattern with a note the pattern is designed by you?
ReplyDeleteI do not mind at all Grace, I appreciate you taking the time to ask and I am glad my explanation was of help :)
DeleteThanks for the pattern...can't wait to give it a try!
ReplyDeleteYou're welcome Dot :)
DeleteI made this tonight for my daughter. Fabulous pattern! Love the video tutorial. Thanks!
ReplyDeleteGreat! I'm so glad to hear that :)
DeleteHello! I am LOVING this pattern, I just have one question - When you start each row with a fpdc (or bpdc) do you do this around the outer-most post? or do you do it around the next one in? I have been doing it the second way I described and I don't think I am getting the same clean edge pattern you have.
ReplyDeleteThanks,
Ari
Yes, you are doing it correctly, if you read farther through the pattern at the end you work rows of sc's around the edges to clean them up :)
DeleteThanks so much! I was almost ready to rip it out and start again!
DeleteHey, thank you so much for this pattern! It was really fun to make :) I only have one problem, every time I did row 4/8, two holes showed up on both sides of the "twist"-part. Is it supposed to do this? :)
ReplyDeleteYes, there is some gaping.
DeleteGreat pattern, Are we able to sell our finished product giving you credit for the pattern?
ReplyDeleteSure, I don't mind and definitely appreciate design credit. Thanks for asking!
DeleteI enjoyed making this. Thanks for the pattern!
ReplyDeleteI'm very happy to hear that! :)
DeleteHow wide is the headband? Thanks!
ReplyDeleteIt's about 4" wide when completed.
DeleteHI, Could you please give me a gauge for this. I see that it is 4" wide, about how many rows to get to 4"? I want to make this with bulky yarn to match a car I made and don't want it to be too big.
ReplyDeleteThan you! Love this design!
Never mind, I just noticed that you have the gauge in the notes. thanks!
DeleteWonderfully written pattern! Very easy work up. Thank you so much for sharing!
ReplyDeleteThank you Eden & you're welcome! :)
DeleteLove this pattern!! Easy to memorize!! Just wondering if you have adjustments available to fit a smaller head, like an 8 year old girl? Thanks for the beautiful pattern and your help!!
ReplyDeleteI'm sorry, I have not made this in a smaller size. If you make this 2 rows shorter it would be roughly 1" smaller in circumference, fitting a 21" head. My 5 & 10 year old sons both have a head measurement of 21", hope this helps. If/when I do make this in a smaller size I will be sure to let you know!
DeleteMmkay, that helps. Thank you!!
DeleteI have never crochet a cable. I had fun making this headband and learning a new stitch. Thank you for the pattern
ReplyDeleteYou're Welcome Tami :)
DeleteWow, Jenni, you're a gem! I can't believe all the time you spent on the pictorial and video of the instructions of your beautiful creation. Had it not been for the video, I'm afraid it would have taken me hours to figure this out, haha! I've been crocheting for 35 years and have never seen a stitch like this. It's beautiful, thank-you! Of all the ear warmers my daughter and I looked at, this is the pattern that my daughter wanted. I'm making me one, as well. Again, I truly appreciate all your time and effort in sharing. Blessings to you!
ReplyDeleteThanks so much Brose :)
DeleteI love this! Made it for myself tonight and can't stop looking at it. Going to search my yarn stash so I can make it in some other colors. Thank you for such an awesome pattern. (ps. is this on Ravelry? I would like to link it to my ravelry page of finished projects if it is ok with you!)
ReplyDeleteI'm so glad to hear how much you like it! You can find this pattern on Ravelry here: http://www.ravelry.com/patterns/library/cable-ear-warmer-2
DeleteI would love if you shared it! Thanks so much for taking the time to leave a comment.
I'm unsure on how to do the edging. I'm not sure where to put the SC. I also sl St after my 48 rows and fastened off, is that a problem?
ReplyDeleteNo, it's ok if you fastened off. You'll just need to re-join with a slip stitch, then ch 1. After chaining 1, sc into the same space. Then work 2 sc in the next space. *1 sc in the next, 2 sc in the next* Repeat around. The "spaces" are your dc's and ch 2's that you are crocheting over. After you join, try the headband on your head to make sure it fits correct, then fasten off. Repeat on the other side. I hope this helps.
DeleteDid you get a chance to put together a video for the edging? I'm stuck too.
DeleteHi! Looks like a great pattern!! I'm interested in making it a bit more narrow - more headband-ish than ear warmer. Can I cut back the original chain and go from there? Any tips would be appreciated. Good work!
ReplyDeleteHmmm, maybe you could cut it back by 4 stitches. Leaving out a dc on each side and the fp/bpdc's? At the end, maybe only work one row of sc's on both sides? It's an interesting idea and I'd love to see your final result! :)
DeleteI love this pattern and being new to crochet I found the picture tutorial really helped. I have got a little stuck now with the edging though. Do you have any pictures to help with this Jenni or maybe a link to the video tutorial you mention please?
ReplyDeleteI am so sorry, I haven't been keeping up with comments because things have been crazy here at home so I am just now seeing this. I do not have a video for the edging (yet). When you start working on the edge, you need to alternate *2 sc, 1 sc* working over the dc's & ch 2's that you previously made when you were working the rows back and forth. I will try and at least get a photo tutorial together for this portion of the pattern shortly. I apologize for the confusion!
DeleteHi Jenni,
DeleteI LOVE this pattern. I've finished it and it looks really cute except my edging doesn't look the same as yours. It doesn't look bad but I like the way yours looks in the picture better. I must have done something wrong but I can't figure out what it is. I was wondering if you ever made a video or photo tutorial of the edging. I would love to see it if you have one or if you make one.
Thanks!
Hi, sorry I'm just now getting to this but I wanted to let you know that I plan on having a photo tutorial up this week. :)
DeleteDang! Everytime I get to row 5 I have trouble. I am not sure where to put the BPDC because of row 4 there are like the 3 FPTC stacked on the other 3? Do I go down to row 3 or to do the BPDC?
ReplyDeleteHi Brit, I think I need to add this to the photo tutorial. The only reason it's a little tricky is because the stitches are all smushed together until you complete row 5. Do not work the BPDC's below on row 3, they need to be worked on row 4. I will try and add to the tutorial in the next few days to hopefully clear up any confusion.
DeleteI watched a crochet crowd video tutorial that showed it perfect. Just completed mine with a fuzzy metallic yarn. Turned out really nice. Great pattern!
DeleteYou skip the 1st 3 in the twist, bpdc the next 3 and come back to the 3 you skipped (ya have to dig a little) and bpdc those and continue to the 2 DC,.. To the end
DeleteHi, I was wondering what kinf of crochet needle did you use? I'm new to crocheting I actually wanted to try it for the longest time but I needed to know what size to buy lol. I'm super excited. Please help me!😆
ReplyDeleteYou'll find all the information about what you need listed under "Supplies", your hook size should be a size H.
DeleteThanks for the lovely pattern, easy to follow.
ReplyDeleteYou're welcome MrsD! :)
DeleteWhipped this one up last night, it was so fun I couldn't put it down! The written instructions were so great, I didn't even realize there were pictures until I scrolled down for the edging instructions! I see many, many more in my future and can't wait to apply the stitch to other projects now.
ReplyDeleteI have these for myself in many, many colors so I get it ;) Thank you for the nice comment!
DeleteI dont understand what to do when you have to skip 3 FPTC next, do you turn to go back to the skip 3? I get some kind of accordian effect and it is not flat.
ReplyDeleteYou do not turn, you will skip 3, work in the next 3 then go back to work in the skipped 3. It will look like an accordion but the piece will flatten itself out as you work the following rows.
DeleteLove Love Love this pattern!!! It was soooo fun and easy to do once I got the hang of it. My daughter and daughter in law want one in several colors. Thank you for sharing this awesome pattern for free!!!
ReplyDeleteYou are very welcome Tammy! I have this ear warmer for myself in many colors! :)
DeleteI noticed some people mention a video. I can't seem to find it. Help!
ReplyDeleteCurrently the only video I have up is a short video for the matching fingerless gloves with the same cable but the cable is not worked on turning rows. That video is here:
Deletehttps://www.youtube.com/watch?v=TwMKPF5x8oU
You can give it a watch and see if it helps but which part are you having a hard time with? Maybe I can help.
I found this through Pinterest and was worried they would be difficult because they look so intricate but you explain the procedure so well and make it so easy! I've made 2 just today and I know I will be making many more, for myself and for gifts. Thank you!!!
ReplyDeleteThank you so much for your comment Leilah! You are very welcome!
DeleteI am having trouble with the skipped ftpdc and then the bkpdc on the skipped ones, my cable just seems to come out in a straight continuos line instead of the angle that shows in the picture
ReplyDeleteI'm not sure how I can help, maybe you want to try and send me a photo? You can message me on facebook @ facebook.com/byjennidesigns or you can email me at byjennidesigns@gmail.com
DeleteI followed the pattern exactly. I used same yarn and hook. Mine came out HUGE! Any thoughts? 5 inches instead of 4. Very wide and a little big around also.
ReplyDeleteI crochet tightly so I listed the gauge in the pattern above for others to follow, it's possible you crochet looser than I do. Maybe try a size G hook instead?
DeleteHello, giving this a try but very confused on skip 3 frogged it a couple of times. Do you have a video by any chance? Thanks so much
ReplyDeleteHi Kaiseih, I do not have a video yet for this pattern. I will let you know when I do have one though. Maybe the tutorial can help?
DeleteI'm having some trouble. The band would've been too big if I'd done the full 48 rows, so I stopped at 40. I sewed up the two ends and I seem to be having trouble with the edging. I have gone around with the sc in the ch space and 2 sc in the dc, but I reach 72 long before I'm near the end, even though I didn't complete the full 48. Any suggestions?
ReplyDeleteBy the way, I absolutely LOVE this cable thing - it makes it look similar to knitting (which I am no good at). Thanks!
I'm guessing you crochet a tad looser than I do ;) Getting the 72 sc stitch count is not necessary, just work your sc's around and try the headband on. If it's too tight you know you need more sc's worked into the row or if it's too loose you'll need to remove some. I would think if you only needed 40 rows your sc count should be more like 60.
DeleteI'm also not so great at knitting but looooove how anything knit looks!
Thank you for your reply! I do tend to crochet less tight because arthritis hands have a hard time getting the needle in the hole, not to mention needing a magnifier. LOL I got done with it and it looks fine. I'm going to make more!!! Everyone is getting one for Christmas! Thank you so much for reply!
ReplyDeleteYou're welcome, I'm so glad it worked out! Happy Holidays!
DeleteI'm not sure I've ever seen such complete and easy to understande directions - for an intricate procedure. THANK YOU for clear pictures/instructions!
ReplyDeleteYou're welcome and thank you so much for your kind words!
DeleteMaking this right now, very easy pattern to follow but I can't seem to get my cables nice and crisp like your photos, any tips?
ReplyDeleteDo you crochet on the loose side? That could be it, I crochet very tightly.
DeleteHello!
ReplyDeleteOn Row 5 when you have to do 6 bpdc do you go in a straight row or do you do the 3 fptrc and then go back and do the other 3 fptrc
Yes, straight across. Bpdc in each as they come to you. I hope that makes sense, it's so hard to put into words!
DeleteHi! I'm not sure I understand the end of the pattern...am I supposed to crochet twice around the edge of the ear warmer so that there are two rows of single crochet around the edge? Thanks!
ReplyDeleteYes, that's correct!
Deletehello dear thanks for the pattern, if i need to make this for my 8 month baby girl any idea where i need to make the changes? kindly advice
ReplyDeletethanks
Hello! I have not made this yet for such a small size but I would suggest omitting a dc on each side of the cable and then at the end of the pattern when you work the edge, I would do one less row of sc's. You will also need to cut many rows near the end, I would definitely use her head as a guide to decide how many rows you need.
DeleteWith these changes your beginning chain should be 13 and row 2 should be worked at follows:
Row 2: Sk first, fpdc around next, dc in next, fpdc around next 6, dc in next, fpdc around next, dc in last. Ch 2, turn. (4 dc, 8 fpdc)
You'll need to change "dc in next 2" in every row after to "dc in next".
I hope this helps, good luck!
thanks a lot i will try it and let you know,,,, any idea if i use the same pattern but without the edging? will that be ok? just will reduce rows till i come up to 16" and follow the same...or i have to ch 13 at the beginning?
DeleteYou can give it a try without the edging, the edging really is just to clean up the appearance. I would chain 13 at the beginning, it may be too wide for her head otherwise but maybe not.
Deletehello when I get to row 5 I have trouble. I am not sure where to put the BPDC because of row 4 there are like the 3 FPTC stacked on the other 3? Do i do the BPDC arounf that 3 which has been crossed or where exactly? please advice. thanks
ReplyDeleteAfter receiving your question I put together a video to hopefully help everyone who has had an issue with this row. It's currently uploading to youtube but will be available at the following link shortly: https://youtu.be/hRDZESJwkE4
DeleteLove this pattern and would love to make a baby blanket with it how would I make the pattern longer
ReplyDeleteYou can make this as long as you like by continuing the repeat over and over, this will only give you one long strip. I suppose you could sew the edges of multiple together though! I've always wanted to create a cable blanket, I'll have to add it to the to-do list!
DeleteI'm finding that there is a lot of gapping around my cables. ANy suggestions how to minimize that? I love your pattern, I also decided since i hate crocheting around to do a foundation chain or something like that instead of the ch2 and it makes the edges a bit neater.
ReplyDeletethanks so much for the pattern
Hi Kristen, I do get some gaping too. I am a tight crocheter but if you crochet loosely you'll get even more gaping. I've played with ways to eliminate it before, it's difficult to explain but I'll give it a shot. Most of my gaping happens in the row that the cables are crossed and what I found is you can work a dc2tog right before and after the cable. For example here's row 4 from the pattern with the dc2tog added:
DeleteRow 4: Sk first, fpdc around next, dc in next, dc2tog, sk 2, fptr around next 3. Fptr around the same space your dc2tog ended in, fptr around 2nd skipped, fptr around 3rd skipped. Starting in the same space as your 3rd made fptr; dc2tog, Dc in next, fpdc around next, dc in last. Ch 2, turn.
If you can understand that then it may help! Sorry, it's a really difficult thing to write out in words which is why I never made it part of the pattern.
You could also try going down a crochet hook size if you are crocheting loosely but you may have to extend the pattern by a few rows.
Hi! It was a piece of cake following this pattern! However, I am having trouble with the edging. My edges don't really look like dc and chains. It kind of just looks like evenly distributed gaps and blobs? Do I sc two in the gaps and sc 1 in the blobs? Also, every other "blob" doesn't have top two strands to hook.. I'm sure I followed the pattern perfectly, just having trouble identifying the dc's and ch 2's. Great pattern! Thank so much for sharing!
ReplyDeleteI love your description of the ch 2's & dc's! I agree, it's about impossible to tell the difference between the ch 2's & dc's. But to answer your question: Do I sc two in the gaps and sc 1 in the blobs? Yes, you should end with about 72 sc.
DeleteIt turned out way better than I thought haha. Looks perfect! Thanks so much!
DeleteI'm so glad to hear that! You're welcome!
DeleteThank you so much for this pattern! I bought a celtic weave pattern from ravelry, and when I couldn't figure it out, I went to Youtube, where I found your video!
ReplyDeleteThank you for clearly explaining this! Once I finish this, I may actually be able to do the celtic wave!
You're welcome Amber! I'm so glad it's of help to someone! :)
DeleteI have a question, I'm left handed and absolutely cannot get this to look right. The section after you create the swirl, your going right to left and I'm going left to right. Is this what's making the pattern look flat?
ReplyDeleteHi Tanya, the row after the cable twists definitely does help it lay flat. I wish I could crochet left handed so I could be of more help!
DeleteYeah the row after does make it look flat but since im going left to right it takes away the swirl completely and just makes it look like a flat bar going through the piece. Ill keep trying!
DeleteThank you tho!
What a beautiful pattern! And lovely tutorials. Thanks so much! I'll be making a few of them!
ReplyDeleteSincerely, Deb
Thanks so much for the gorgeous pattern! I'll be making a few!
ReplyDeleteSincerely, Deb
You're very welcome Deb! :)
DeleteThank you for the beautiful pattern.
ReplyDeleteYou put a lot of work into it.
You're welcome Laura and thank you so much for all your nice comments!
DeleteHappy crocheting!
Thanks for this great pattern. I just started a year ago to knit and crochet so I consider myself as a beginner.
ReplyDeleteI'm always looking for new patterns and this week I found yours on Pinterest! Great job I did it and it looks so good I plan to do quite a few more of every colors...
OMG I am absolutely in love with this pattern! Thank you so much!
ReplyDeleteI believe this is the BEST pattern I have ever followed. You should be a pattern editor, you could retire!! Thank you!!
ReplyDeleteThank you 😊 for the cable slouch beanie pattern. I was able to finished it but haven't posted pictures yet.
ReplyDeleteThank you so much for this pattern! The YouTube tutorial helped me so much! I can't wait to finish the headband for my mom for Christmas!
ReplyDeleteCan't wait to get started on this pattern. Thank you for sharing
ReplyDeleteCan't wait to get started on this pattern. Thank you for sharing
ReplyDeleteCan't wait to get started on this pattern. Thank you for sharing
ReplyDeleteGreat pattern. I enjoyed making it and will make it again.
ReplyDeleteHi Jenny, love your pattern, i made 1 for myself and it looks great, thank you!
ReplyDeleteGreat site you have got here.. It's hard to find high quality writing
ReplyDeletelike yours these days. I seriously appreciate individuals like
you! Take care!!
Quality posts is the crucial to be a focus for the viewers
ReplyDeleteto go to see the website, that's what this web site is providing.
Hi I'm Angie. I wanted to ask you if it's ok if I sell my finished product from using your pattern?
ReplyDeleteHi Angie, yes that is 100% fine with me :)
DeleteThank you for a stellar pattern! I made one for my daughter and just got asked to make on for a friend! <3
ReplyDeleteYou're welcome :) Thank you for the comment!
DeleteI have dk/light/3 yarn. Where would you add stitches in order to make it 4” wide. I’ve tried adding a dc at either end but then the cable looks to narrow. Thanks
ReplyDeleteI am so sorry that I am only now seeing your question, I have not yet tried dk yarn for this pattern. I would guess that the cable would need to be widened by working it over 8 stitches vs 6 :/
DeleteYou've made some decent points there. I looked on the net for more information about the issue and
ReplyDeletefound most individuals will go along with your views on this web
site.
Have you ever thought about publishing an e-book or guest authoring
ReplyDeleteon other blogs? I have a blog based on the same topics you discuss and would love to have
you share some stories/information. I know my readers would appreciate your
work. If you're even remotely interested, feel free to shoot
me an e-mail.
Hey just wanted to give you a quick heads
ReplyDeleteup. The text in your content seem to be running off the screen in Opera.
I'm not sure if this is a format issue or something to do with
web browser compatibility but I figured I'd post to let you know.
The design look great though! Hope you get the problem fixed soon. Many thanks
Hey There. I found your blog using msn. This is an extremely smartly written article.
ReplyDeleteI will make sure to bookmark it and return to read extra of your useful information. Thanks for the post.
I'll certainly comeback.
Very good article. I definitely love this site. Stick with it!
ReplyDeleteYour style is so unique compared to other people
ReplyDeleteI've read stuff from. Many thanks for posting when you've got the opportunity, Guess I will just book mark this page.
Hello there! Would you mind if I share your blog with my zynga group?
ReplyDeleteThere's a lot of folks that I think would really appreciate your content.
Please let me know. Thanks
Howdy, i read your blog occasionally and i own a similar one and i was
ReplyDeletejust wondering if you get a lot of spam responses?
If so how do you prevent it, any plugin or anything
you can suggest? I get so much lately it's driving me mad so any support is very much appreciated.
Yes, I do but I also have no idea how to prevent it besides moderating the comments :/
DeleteVery quickly this web page will be famous among all blog visitors, due to
ReplyDeleteit's pleasant articles or reviews
Thank you, I have just been looking for info about this subject for
ReplyDeletea while and yours is the greatest I've discovered so far.
However, what in regards to the bottom line? Are you positive in regards to the source?